Wednesday, November 2, 2016

My beading life - THE Colorado Bead Retreat

I used all capital letters for THE in the title because this retreat is the best ever!  I knew it would be fantastic.  Attendance requires that you have gone before to get "in" or be lucky enough to be selected for one of the few lottery slots.  Betcey Ventrella of Beyond Beadery and her fantastic staff set the gold standard for treating beaders to a combination of a great atmosphere, food, shopping, pampering, goodies, and fantastic teachers. 

The pendant swap and desert social Thursday evening was a great kick off.  I've never seen such a fantastic collection of pendants.  Most, if not all, were bead embroidery.  The pretty sparkling pendant I received was made by Janis Starkey.  The donut used is labadorite which is stunning.
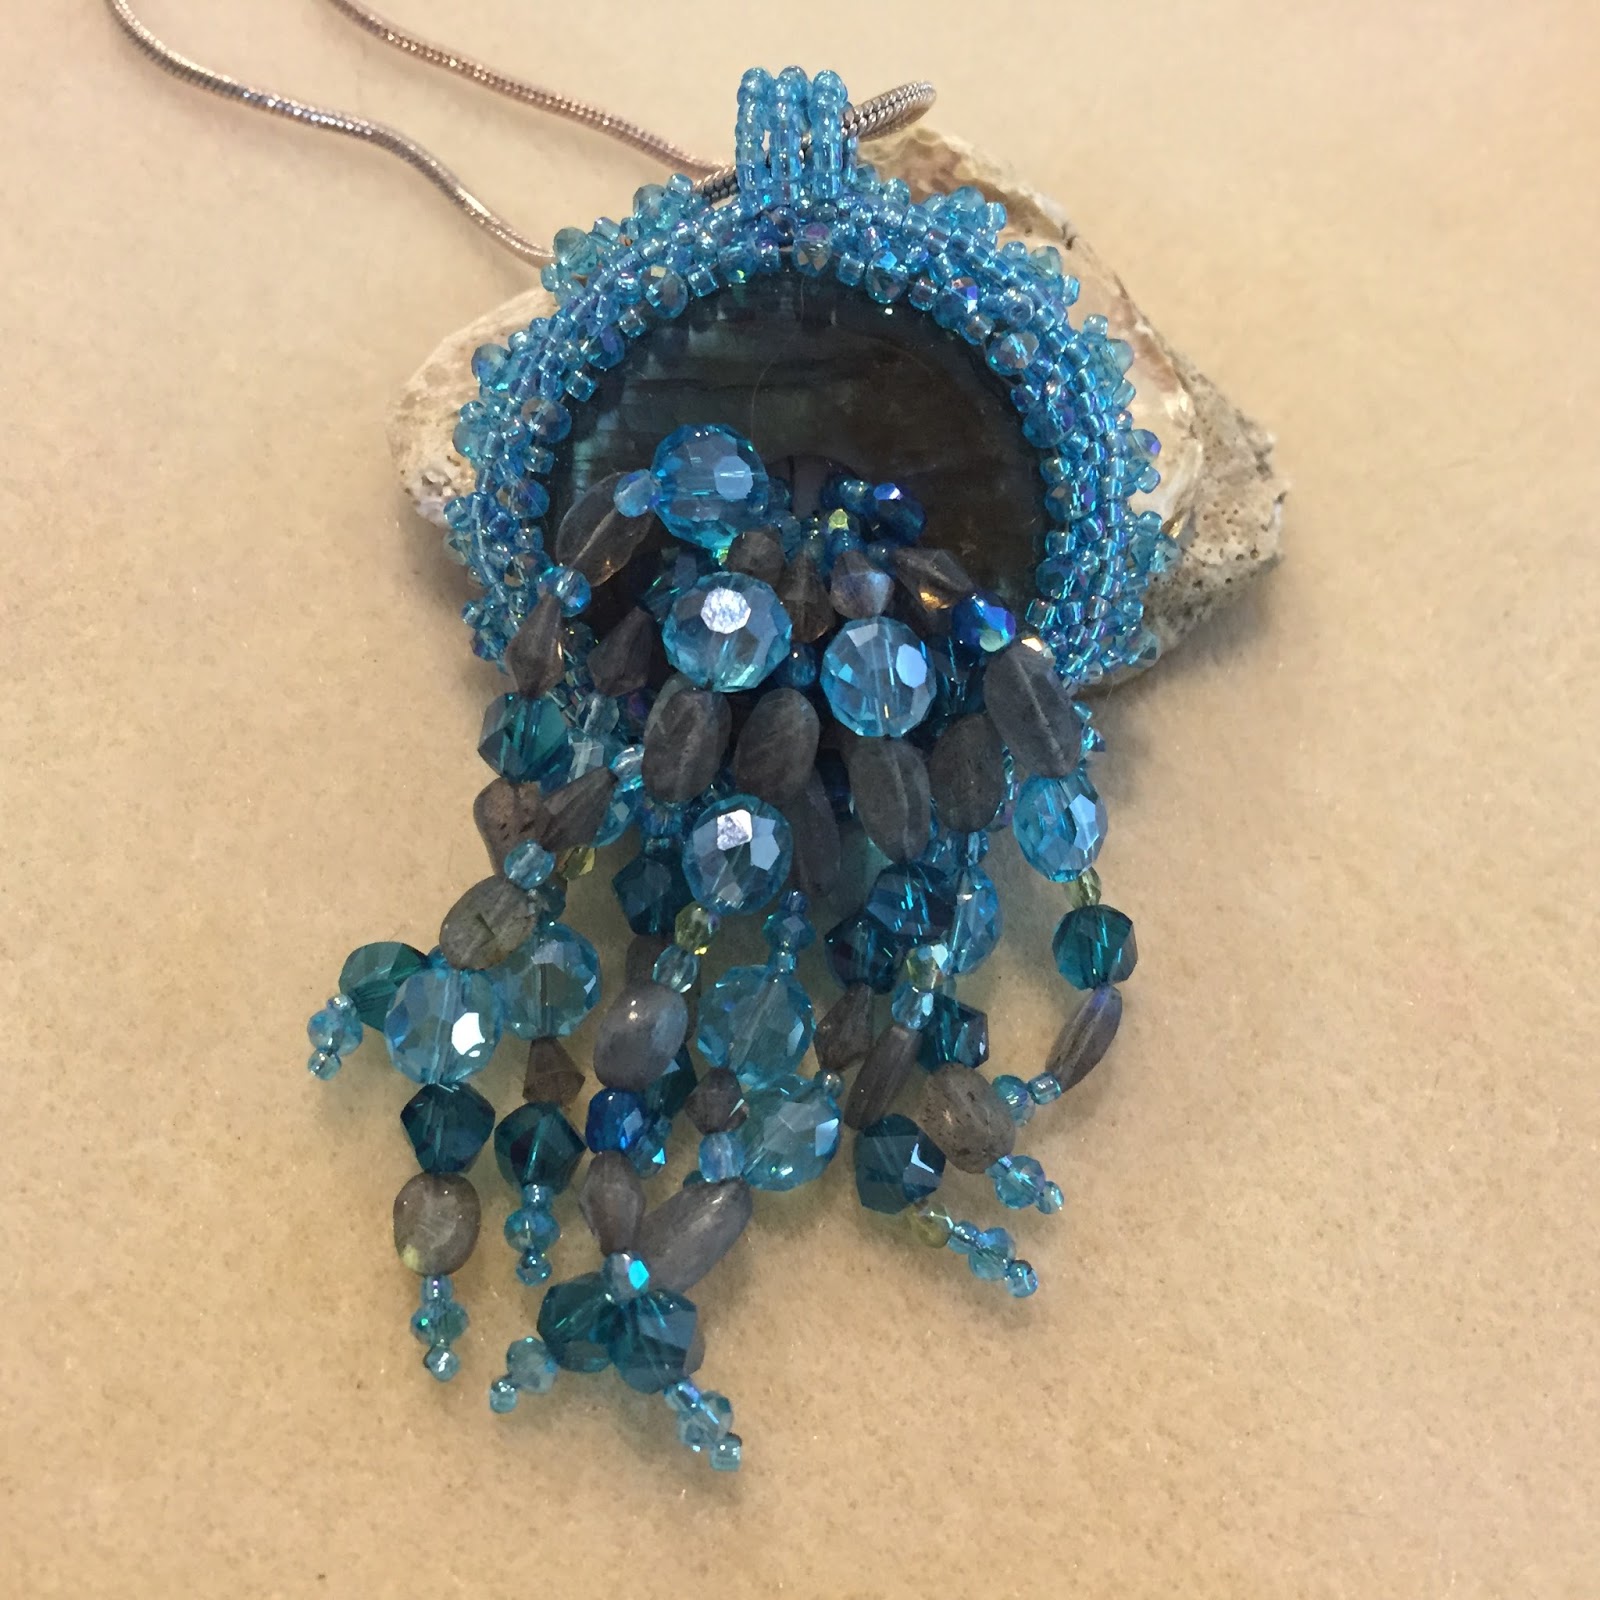
The flowing chocolate fountain during the social was a tempting display as were all the other goodies.  The event was a spectacular kick off for what was to come.  When I returned to my room, I found a goodie bag filled with all kinds of wonderful treasures from all over.  The sponsors of the event really provided some amazing items for everyone.

The classes were all perfection.  I loved them all.  I really enjoyed that they were all bead embroidery with such wonderful teachers.  For me the bead embroidery really set this retreat apart from the growing number of bead retreats all over the country.

Heidi Kummli's pendant is fantastic.  It was so much fun to see how it came together and it was the first project I wore outside of the event.  It is reversible and a such a really nice piece of engineering.  Her colors selected for the 3 kit options were all fantastic.
 

Sherry Serafini's cuff was also great fun to make and I've worn it already to the Il Divo concert in Clearwater, FL.  It was a fun piece to wear to such an outstanding event.
Finally, my project with Kinga Nichols is finished as well.  This spectacular cuff was fun to do, I loved making the bridges.  It took longer but was well worth the time.  I love it.
And for me, nothing tops being in Colorado with the mountains.  The group was warm and friendly and I felt welcomed to the event.  I was thrilled with the special 'Wolf" meeting and talk.  And as you can see, the 'wolf' meeting was popular with many at the retreat.
I was very lucky during the drawing for the prizes associated with the tickets for the Wolf charity.  I won a beautiful Laura Mears moth.  What a wonderful bonus for the weekend.  I look forward to making a bead embroidery pendant or necklace to feature this piece of art.
I've always love Colorado and the opportunity to bead and just to be there, was an event I'm glad to have attended.


Sunday, October 9, 2016

The Snips

New products come out from time to time that are really worth purchasing.  I'm usually slow to try something new unless of course it is a bead.  It took me years to try a Bead on it Board.  I didn't believe the hype.  If you are wondering about one of the several beading boards now available, it is true!  They are worth the investment and I don't know why I waited so long.  But I digress.

In this case, a friend is selling the Super Snips, they are inexpensive which is a bonus and cute too.  So I figured I would try them.  Her ad says they cut Fire Line like it is butter.  Really?  Color me skeptical.

I have dozens of pairs of scissors.  I have purchased all kinds, from less expensive kids scissors to more expensive embroidery types.  I have also purchased a pair of rather expensive Xuron scissor type cutters and they do work very well on various lines and threads.  But I don't want to purchase several pair to have all over where I'm apt to be beading.    Ok, so I could be a little more organized.  Sorry, that isn't going to happen. 

I travel a bit and prefer to use smaller less expensive scissors to pack.  You just never know when you are going to run into a TSA clerk having a bad day.

Typically scissors will just bend the line over if you try to just snip it off without maintaining some kind of tension on the line.  Also, as the various lines dull the scissors, it gets worse and worse.  I've tried to sharpen scissors without much success.  And if you are a fan of Power Pro line, one of the best lines to use for loads of crystals, it can be very hard to cut it with traditional scissors. 

These little Super Snips are under $5.00.  Frankly, I did not expect that they would work.

At first, I cut as I normally do with a little tension on the line.  Then, as I used them over and over, I tried cutting without even holding the other end.  WOW I am a convert.  Ok, so I don't have much of a life outside beading, little things excite me.

SO, I tried them on PowerPro both 8 and 10 pound, tried them on Nanofill, One G and other threads.  They snip the thread right off without holding the other end of the thread on all of them.  Pops off like magic.  I didn't believe it.  So I tried again figuring it was a fluke.  Best darn little thing I've ever seen.  The cute little cover to put on the tips is a bonus.

I'm not big on video but gave it a try to show how great they are.  The video is on YouTube and the Baubles by Balonis Facebook page as I could not get it to load on this blog.  Search Super Snips on YouTube and you will find it.

You can get the Super Snips at:  Beads by Dee


Tuesday, September 20, 2016

My Beading Life - Off to Alaska

What could be better than a bead cruise to Alaska?  I do love to cruise.  I also love to bead so the combination is a great thing for me.  Add in a trip to Alaska and I'm one lucky girl. 

This trip was organized by Amy Loh Kupser of I-Bead.com.  Her bead cruises are different.  She hosts a smaller group and offers organized days to bead while at sea.  She does not include a guest instructor.  She brings a selection of kits, some are her own, some from other national instructors.  For me the format is perfect.  I have enough projects and or other kits to keep myself busy.  But I do love being with fellow beaders and this format works to keep us organized and beading while enjoying the cruise.  Behind me when I took this picture from our private bead room were large windows overlooking the stunning views of Alaska.
 
Two of the projects I finished are shown next.  The green one is a rambling bit of bead embroidery on Shibori silk.  The focal at the center is by Heather Powers.  I didn't have much of a plan except to play with the silk and use Heather's great focal.  I even added the brown beads from the fantastic goodies in our gift bag.  It is a little odd but I like it, very light!  The second piece is mostly a kit from Betty Stephan.  I changed a couple things as I'm apt to do.  It was fun to do and perfect for a relaxing day at sea.

Want to have a massage?  No problem, leave the bead area, you 'stuff' will be safe, get your massage and return.  You can pick up where you left off with your work.  Bead cruisers come and go and mostly bead bead bead.  It is perfect for me.
 
A little sentimental for me as many of these stops brought back happy memories of my brother.  In Skagway, I recreated a pose in the Red Onion Saloon.  I think Ed enjoyed it more than I did.

And of course there is Alaska!  Our bead room allowed us to look out at the marvels of the coastline or sea.  We saw whale several times from the ship! 

 
Next time it will be New England and Canada departing September 10, 2017.  Check out I-bead.com for more information.

Wednesday, August 24, 2016

How Much Thread??

As a teacher I have observed different reactions to thread length for years. This came under a spotlight at a recent show where I taught. For years, I have included the yardage required to complete the project.  I also include if the project will work if half the thread is parked somehow.  (More on that later.)  I always tell students to take the longest thread they are comfortable with.  I like to use just over a wingspan which, although it differs for everyone, is also commonly the amount you arms will work best.  Taking a project length does not work well for most people as you are asking for problems.

Long thread lengths tend to tangle more,  it tends to catch something on your work space or on your project, it slows you down pulling over and over thru the beads, and it wears on the thread in many designs causes freaying or weak spots.  Recently, I have about decided I should stop telling people how much a project requires if only to protect people from themselves and unnecessary frustration.  

I watched one lady struggle in class with 5 yards of thread. I suggested she "park" half on the Spoolie I had provided. She didn't want to do that. Ok I said, suit yourself I thought and I moved on to other students.  She continued to struggle. I suggested she cut the thread.  "No I'll manage."  I continued with other students. During this time, I showed several how I like to add thread.  I untangled "Miss Stubborn" a few more times. I suggested cutting again...
Finally after wasting a couple hours she relented and let me cut a lot off. It wasn't 15 minutes before she said "This is much better."  At the end she said she should have listened, the shorter thread was a lot better.  Ok, we learn a LOT of our lessons the hard way. 

I get it, many bead weavers struggle adding thread. Others dread threading needles over and over.  (Please try the Tulip needles if you have problems threading needles - they are easier and worth the extra money.)  For whatever reason, people often take more thread than is easy to work with.   It is actually counter productive.  The time lost adding thread is nothing compared to the frustration of tangles, knots, and pulling over and over to use a long piece of thread.

The only exception I make to taking a little over a wingspan is when I can park thread. That can be done many ways. I like the little Spoolies, but a sponge roller works well, as do little embroidery floss holders. You can take twice your comfortable length, find the mid point, and store half the thread on your device of choice winding it from the middle to one end.  This technique works similar to a bead stopper with the storage device acting as the bead stop.   The thread is then available to use later without weakening the thread, slowing you down pulling over and over or taking out knots. This works well on constructed designs which go back and forth or on a design which works equally well in both directions. It does not work with all designs.

The long and short (pun intended), is that it is a happy day when you figure out that shorter is better for most of us when working with needle and thread.


Tuesday, August 16, 2016

Bead and Button 2017

The highlight of my summer is often the shipment of my class proposals, all carefully packaged in a box, to Bead and Button for the following year.  Many changes are coming in 2017, some beyond the results of the election this year.  In the bead world, Bead and Button changed the requirement for returning teachers to ship the physical samples to Wisconsin for the initial evaluation.  I understand, it is expensive to ship all those projects back!   Initially, I welcomed the change.  No projects to send, no worry about my samples gone for so many months.  This is a bonus for their repeat teachers who are bead designers sending in proposals.

However, for me it was also a bit of a let down in some strange way to mail my class proposals, as paper only, in a flat priority envelope.  I have done it this way since before 2003!  (My first two years they did not pick any of my proposals.)  Ultimately, not mailing in is a good thing as some of the proposals this year are also being taught elsewhere before B&B and now I won't have to have as many samples.  As I entered one last piece in the system on August 10th, there were 541 proposals in the system.  I'm positive that many people wait until the very last minute so there will be many more by the deadline which has now been extended another week!  Lots of work for staff to evaluate and make selections.

I now anxiously wait until fall to hear which of my class proposals they select.  I like them all but I do have a couple favorites and I'm hopeful they will see it the same way.  I also have a several still on my bead mat unfinished.  I had to stop from creating anything else as I needed to prepare for my Artisan table and teaching at BeadFest Summer in Philly.  As usual,  I have mostly bracelet projects.  I tend toward bracelets because I cannot wear much around my neck any more.  Too many years with heavy pieces have taken their toll.  I'm not complaining, it is only a fact of my life.  It is somehow hard for me to design something I know I can't wear.  Here is some eye candy of my 2017 Bead and Button class proposals.  And now the WAIT begins.


Thursday, July 28, 2016

Baubles and Beads: The Finishing Touch

Baubles and Beads: The Finishing Touch:   For me the clasp is often the finishing touch on a piece.   What do I consider when selecting a clasp?   There are quite a few factors....

The Finishing Touch

 
For me the clasp is often the finishing touch on a piece.  What do I consider when selecting a clasp?  There are quite a few factors.

First, is the piece only for me?  If so, I have a few ‘go to’ choices for my pieces.  On a necklace my personal preference is one of the premium quality ‘snap’ clasps also called ball and socket or trailer hitch.  They are mostly a functional clasp.  My old hands like them and can work them easily without torture.   The only exception for a necklace being a beaded toggle or a push pull type clasp that works on a spring mechanism.  I almost never use a lobster clasp for myself as I have a hard time working them with my hands.  And although I can work with a metal toggle, if I’m to use a toggle, I usually make it.

For a bracelet, I have several personal preferences.  On narrow pieces, I normally use the snap clasp.   For a flat piece, I inevitably use one of two clasps.  The choice depends on the fit which is often governed by the pattern.  I like to make a peyote or herringbone toggle and loop when that works.  If not that, I select a premium German clasp from Claspgarten or Elegant Elements (same clasps different names).  I like the narrow bar clasp they sell in several styles and number of holes to connect.  Finally, if it is a chunky piece, such as my Tile Mosaic, I will look for something special for me.  It could be almost anything, but will still be from the above mentioned German company.

For a class piece or kit, I consider other factors in my choice.  I prefer to select a clasp that compliments the piece.  And my favorite is still one that comes from my favorite German source.  Consider the look of the flowers sewn in Pockets full of Posies and the choice of the enamel flower clasp. 

On Going to the Ball, I used a similar size of round clasp to compliment the size of the Rivoli components. 

Sometimes, I’ll use a toggle and loop on a bracelet by design.  Curacao is a piece where that was my choice.  Ok, I’ll be honest, I made the first one while away from home and didn’t have my stash of clasps and wanted to finish it.  SO, a herringbone toggle happened. 

For a bead embroidery piece, the clasp choice often depends on fit.  My favorite choice is usually the same type of slide clasp.  However, in the case of a piece made too big, I make a toggle and loop which can be done to correct the fit problem.  Notice how the same style herringbone toggle connection is set back from the edge to make it tighter.   The same fit problem was solved with a right angle weave toggle on the next example.  


Another inexpensive option is a button and loop.  This has the bonus of also allowing you to adjust the fit a little by moving the button and loop back from the edge if needed.   It is also kind of fun to go thru your button box to discover a treasure and remember something to make you smile when you wear the piece.  Another inexpensive option is to make a little ball clasp done with right angle weave and embellished.  The little ball clasp or other hand made clasp does work well to dress up a piece.  The final picture shows a peyote clasp with different size beads and little drops in the center.  Have fun making clasps for your work and you will enjoy your finishing touch.


My final comment today on clasps is to add a clasp that for you is both functional and attractive.  We spend a lot of time on our beadwork and the clasp is a finishing touch.